Colours provide web pages with interest and personality. One way to add colour to a web page is to include images.
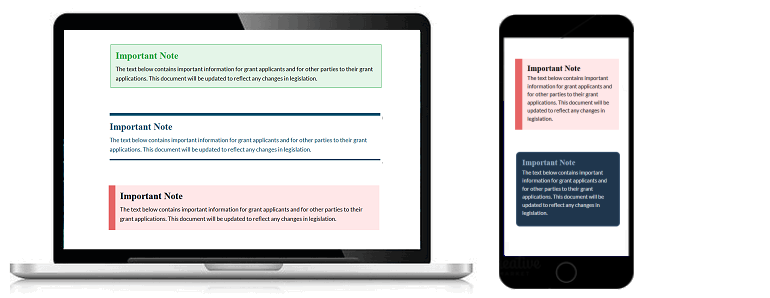
You can see from the examples below how the same image but with different dominant colours affects the impact of a web page.
Many research studies have shown that colour choice in design influences user psychology and behaviour. For example:
The colour brown is associated with warmth and cosiness.
Blue inspires trust and confidence.
And red evokes emotions of excitement and passion.
At the end of this Tutorial is a list of resources you may find helpful when choosing website colours.
Colours: three CSS properties
This Tutorial will focus on adding colours to a web page by setting values for the following three CSS properties. Note the US-style spelling in each case.
color: You use this to set the colour of text elements, such as headings, paragraphs, lists and links.
By default, web browsers display text in black.
background-color: You can use this to set the colour behind text elements, the background of a <div> or the background of the entire <body> of a web page.
All backgrounds are coloured white by default.
border-color: As with background-color, this can be used with text elements, <div> elements and the <body> as a whole.
All borders are coloured black by default.
   color: /* Insert colour value here */;
   background-color: /* Insert colour value here */;
   border-color: /* Insert colour value here */;
In the example below, you can see the text elements <h2> and <p> both have a color of dark blue. They are positioned in a <div> with a class name of "container-box" that has a background-color of light pink.
And here are some examples of the border-color property in use along with text color and background-color properties.
In web design, there are three common systems for setting colours:
The colour name system
The RGB system
The hex code system
The next three sections of this Tutorial will explain each colour system in detail.
The colour name system
Simply typing a colour name – such ‘red’ or ‘blue’ (without quotes) – in a CSS rule is a common starting point when designing a new web page.
h1 { color: red }
Many colour names are both easy-to-remember and self-explanatory. For example, ‘yellow’, ‘purple’ and so on. Other colour names are less obvious, such as ‘hotpink’, ‘mediumvioletred’ and ‘lavenderblush’.
Colour names are not case-sensitive. For example, these three versions of the same colour name are all valid.
However, the final version of a web page will typically use either RGB values or hex codes rather colour names for the following two reasons:
Limited choice: Modern electronic screens can display at least 16 million different colours. With colour names, you are limited to only 147 choices.
Misleading names: Even when colour names are easy-to-remember, they are not always accurate. For example, DarkGray is actually lighter than Gray.
Note that, in CSS, the colour name of grey can be written in either US spelling (gray) or UK spelling (grey). Either will work correctly.
The RGB colour system
The RGB system is based on the following idea:
Any colour can be created by combining different intensities of the three primary colours: red, green and blue.
Here are a few points about the Red-Green-Blue colour system:
Every RGB colour is written as a list of three values: first the red value, then the green value, and then the value for blue.
The individual values are separated from one another by commas.
You can write each individual value as a percentage (0% to 100%) or a number (0 to 255). The following two examples both produce the colour red:
100%,0%,0%
-or- 255,0,0
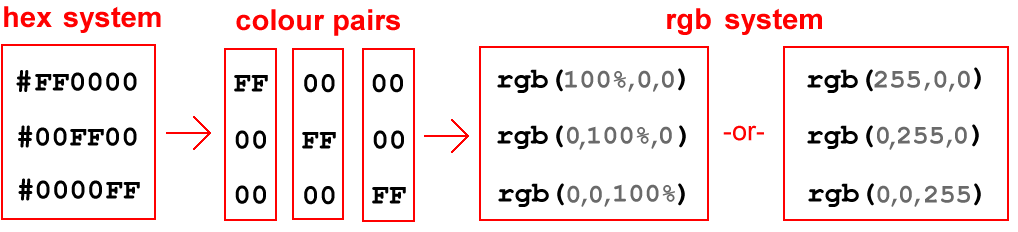
The three values are enclosed within brackets and preceded by the letters rgb (in lower-case or upper-case). In the example of red, the CSS value would look as follows:
rgb(100%,0%,0%)
-or- rgb(255,0,0)
The following examples of CSS rules show the RGB system used to create the three colours of blue, a light brown and magenta.
This is the colour system most widely used in web design. As with the RGB system, the displayed colour is created by combining different intensities of red, green and blue. But the hex (short for hexadecimal) code system is different in four ways:
The hex colour code begins with the hash (#) symbol.
No commas are used to separate the red, green and blue values from one another.
The list of red, green and blue values is not enclosed in brackets.
The red, green and blue values are each written as a pair of two hexadecimal numbers.
Here are the three colours of blue, light brown and magenta written as hex codes in CSS rules.
Like colour names, hex codes are not case-sensitive. For example, both #0000ff and #0000FF are valid and display the colour blue.
Understanding the hex code system
A hex colour code may look like a random jumble of numbers and letters. Given that this system is so widely-used in web design, however, it is worth taking a few moments to understand how this colour system works.
Here are the main points to note:
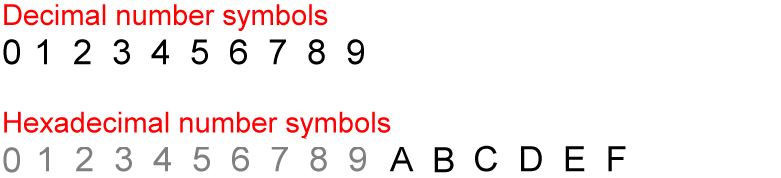
In the everyday decimal system, there are 10 number symbols: 0, 1, 2, 3, 5, 6, 7, 8 and 9.
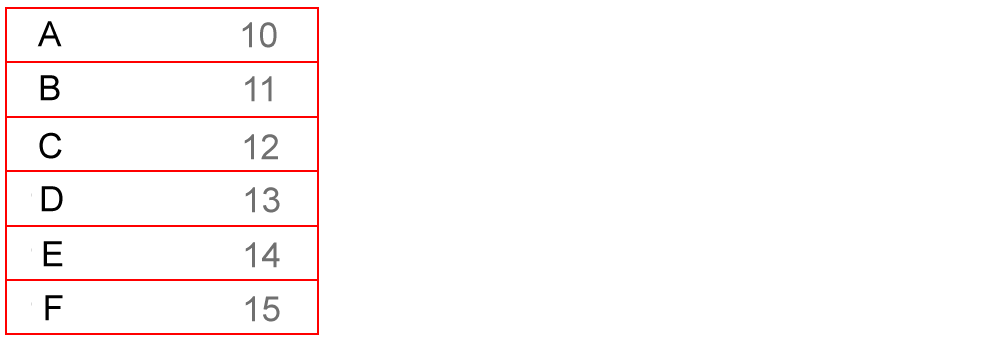
In the hexadecimal system, however, there are 16 number symbols: 0, 1, 2, 3, 5, 6, 7, 8, 9, A, B, C, D, E and F.
The hexadecimal numbers A, B, C, D, and E are equal to the decimal numbers 10, 11, 12, 13, 14 and 15.
Every hex colour code is really a combination of three number pairs.
As in the RGB system, the first pair is the red value, the second pair is green and the third is blue.
The smallest possible value for a pair of two hex numbers is 00. This hex code pair is equivalent to a zero decimal percentage (0%) or the decimal number zero (0).
The largest possible value for a pair of two hex numbers is FF. This hex code pair is equivalent to one hundred per cent (100%) in decimal or the decimal number of 255.
So, in the hex colour code system:
The colour white is #FFFFFF, as all three primary colours are at their maximum intensity: rgb(100%,100%,100%) or rgb(255,255,255).
The colour black is #000000, as all three primary colours are set to zero: rgb(0%,0%,0%) or rgb(0,0,0).
Three-digit, short-hand hex codes
Not every hex colour code needs to be written as a string of six digits. You write some hex colours in three-digit shorthand.
Consider the example of the colour white. In CSS, you can write this in two ways:
#FFFFFF
-or-
#FFF
The general rule is as follows:
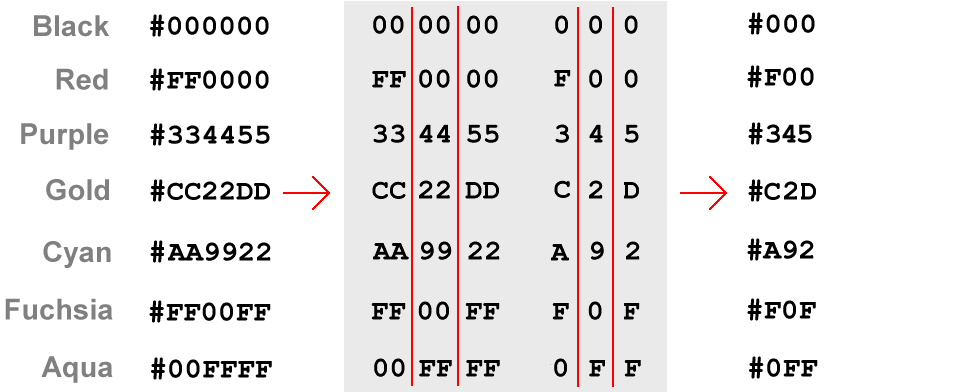
If any of the three pairs in a six-digit hex code is a duplicate, you need only write that hex digit once.
You can see some more examples of three-digit hex codes below.
For every colour above, three pairs of duplicate hex digits (such as 00, 33 or FF) are shortened into one digit.
Your two work files: base-7.html and base-7.css
In this Tutorial you will work with these two files:
The web page named base-7.html. This is a copy of the base-6.html file from the previous Tutorial.
The stylesheet named base-7.css. This is a copy of the base-6.css file, also from the previous Tutorial.
First, let’s edit the HTML file from your previous Tutorial:
In your text editor, open the file named base-6.html.
Use the File | Save As command to save your base-6.html file with this new name:
base-7.html
You can now make changes to this new base-7.html file without affecting the base-6.html file from your previous exercise.
In the <head> of your new base-7.html file, change the title as follows:
<title>Responsive web page with coloured text boxes</title>
Also in the <head>, change the description as follows:
<metaname="description"content="A sample responsive web page with examples of text in coloured boxes.">
Also in <head>, change the stylesheet link as follows:
<linkrel="stylesheet"href="base-7.css">
You are now finished making changes to your base-7.html file.
Save the file with the File | Save command. Or press the Ctrl key (Windows) or Command ⌘ key (Apple) and press the s (for Save) key.
Switch to the base-6.css file, and use the File | Save As command to save the file with this new name:
base-7.css
You are now ready to work with your new web page (base-7.html) and stylesheet (base-7.css).
Adding text and background colours to the four <div> boxes
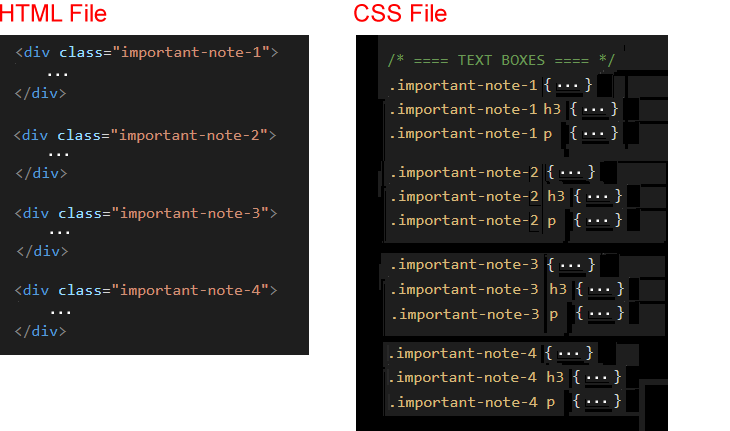
In the base-7.html web page are four text boxes created by <div> tags as shown below. And for each <div> are three related styles in the base-7.css file.
Let᾿s add some CSS colour rules for the first of the four <div> elements.
In your text editor, switch to the base-7.css stylesheet file.
To the .important-note-1 selector, add the following two new style rules:
Save the CSS file, and view your base-7.html web page in your web browser. You should see that the first of the four text boxes has been updated with your new colour style rules.
Now, let’s move one to the second of the four text boxes.
To the .important-note-2 selector, add the following two new style rules:
Save the CSS file, and view your base-7.html web page in your web browser. The fourth text boxes should now look as shown below.
Identifying colours with web browser DevTools
You can use the DevTools feature of web browsers to identify the colour of text and backgrounds on a web page. For example, use your web browser to visit the following website:
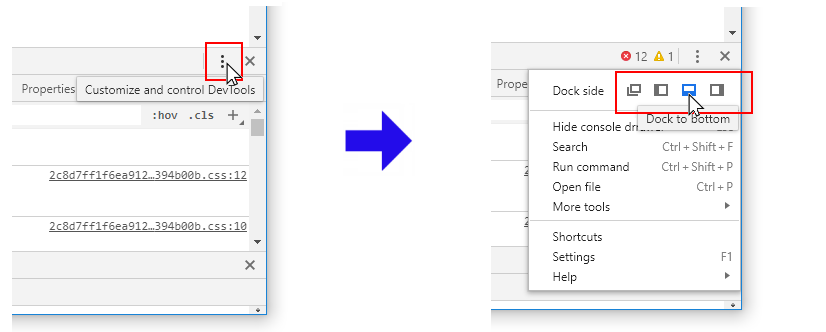
Press F12 to display the Chrome DevTools window.
You may find it easier to use this option with the DevTools area positioned (docked) at the bottom of the web browser window.
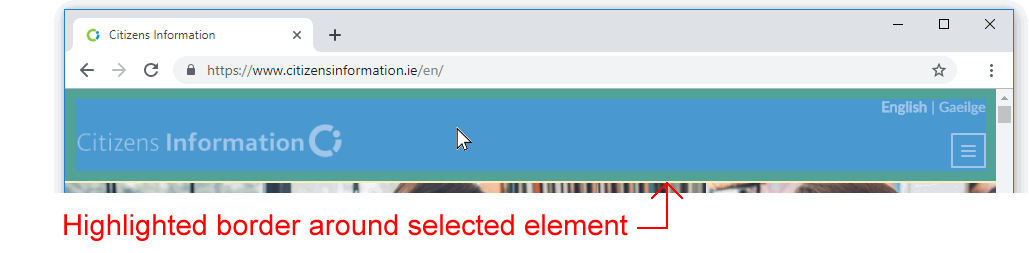
Click the Select arrow at the top-left of the Chrome DevTools window.
Click on the header of the web page with the blue background. Chrome DevTools surrounds the header with a colour border.
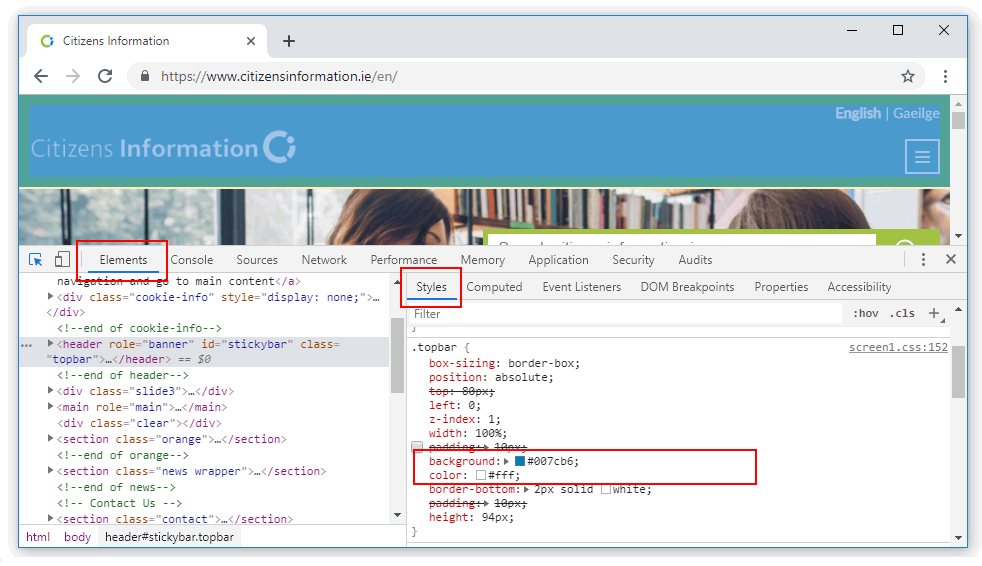
In the Chrome DevTools window, you can see the Elements panel at the left and the Styles sub-panel at the right.
In the Styles sub-panel, you can see the text and background colour values of the selected web page element.
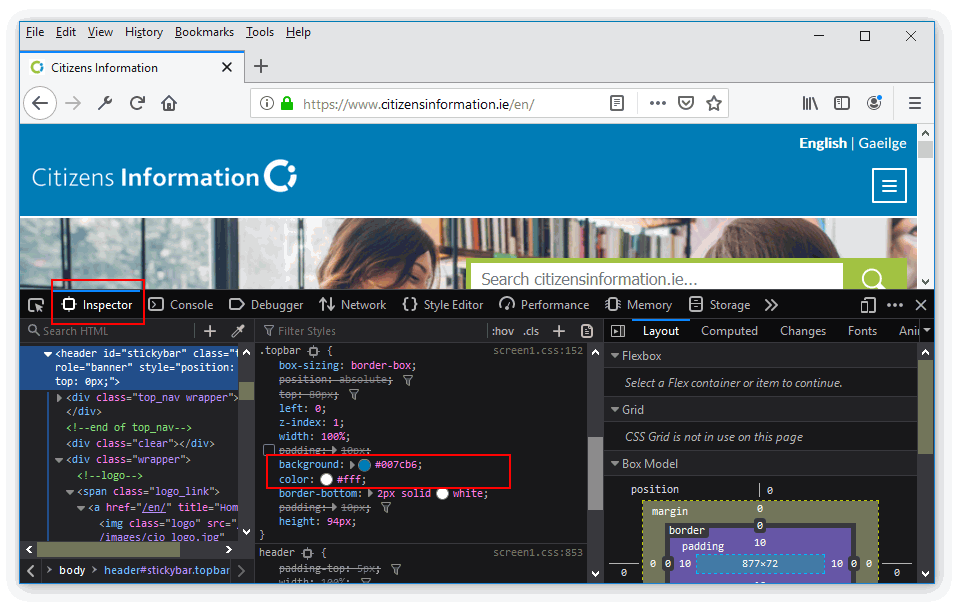
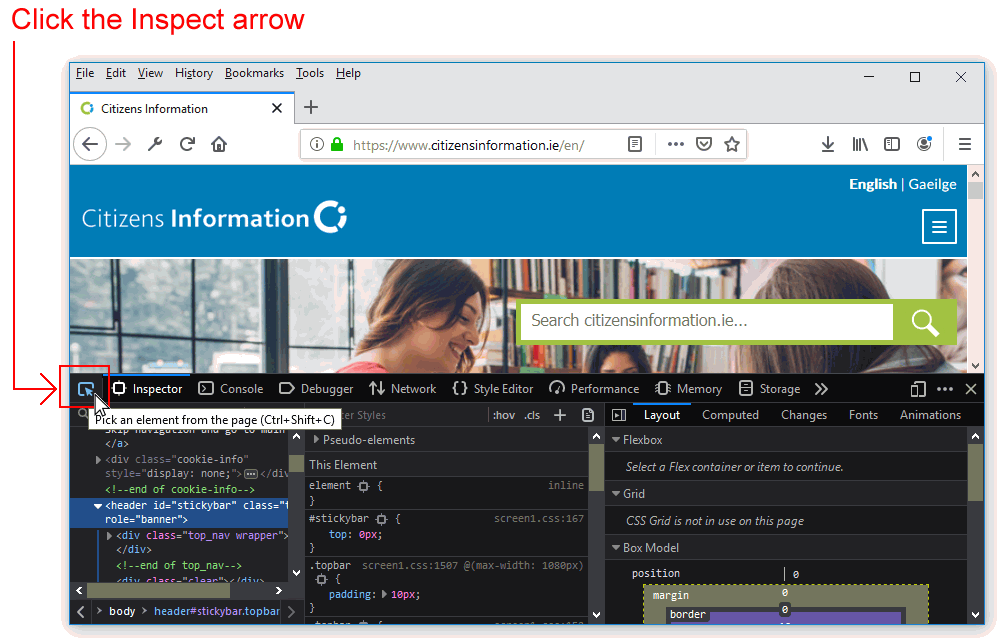
To use the DevTools of the Mozilla Firefox browser:
From the Tools menu, choose the Web Developer command and then Inspector.
You may find it easier to use this option with the DevTools area positioned (docked) at the bottom of the web browser window.
Click the Inspect arrow at the top-left of the Firefox DevTools window.
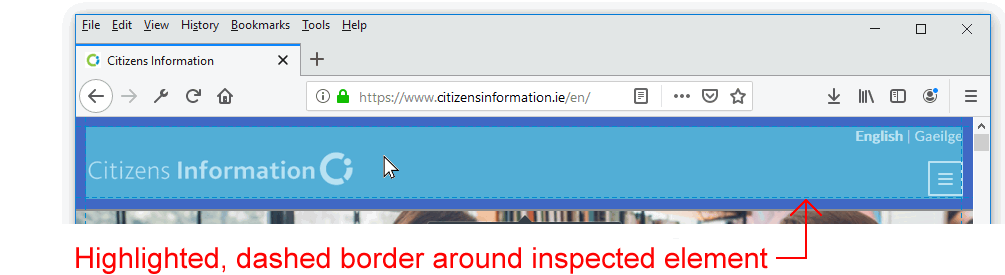
Click on the header of the web page with the blue background. Firefox DevTools surrounds the header with a blue, dashed-line border.
In the centre panel of the Firefox DevTools window, you can see the text and background colour values of the selected web page element.
In both Chrome and Firefox DevTools windows, you can edit the CSS colour or other values of any selected web page element.
Here are a few resources to learn more about DevTools:
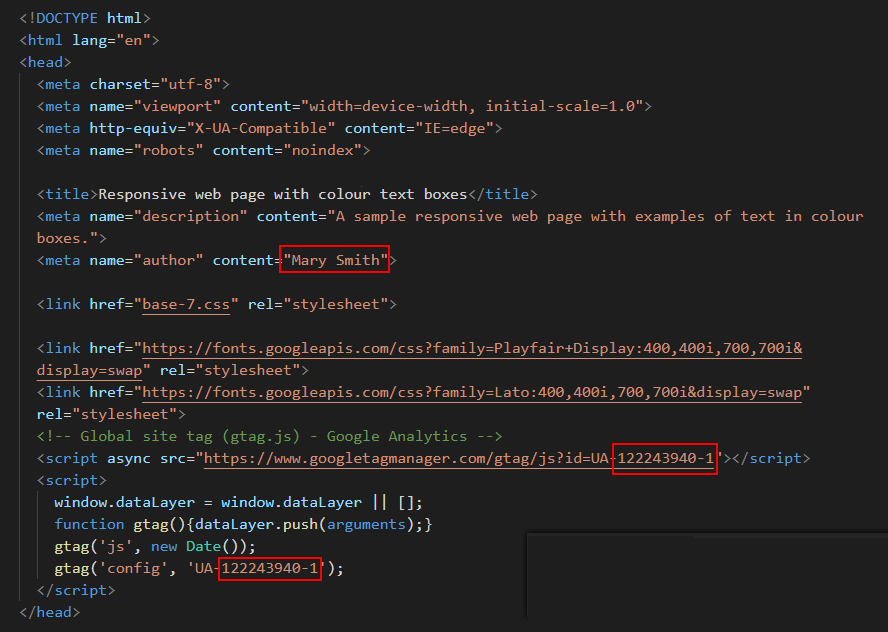
Before you validate your web page and upload it to GitHub, ensure the following details are correct within the <head> of your base-7.html file.
You have replaced the name ‘Mary Smith’ with your own name.
You have replaced the sample Google Tracking ID with your own Google Tracking ID. The instructions for viewing your website’s unique Google Tracking ID are here.
Validating your web page
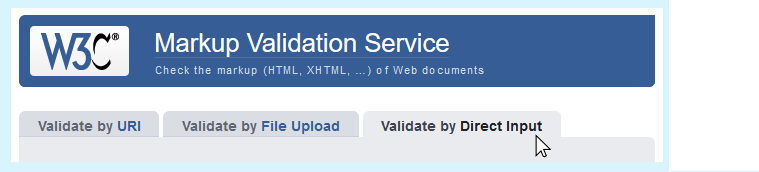
To check the HTML in your web page is correct or valid, use the official W3C Markup Validation Service as follows.
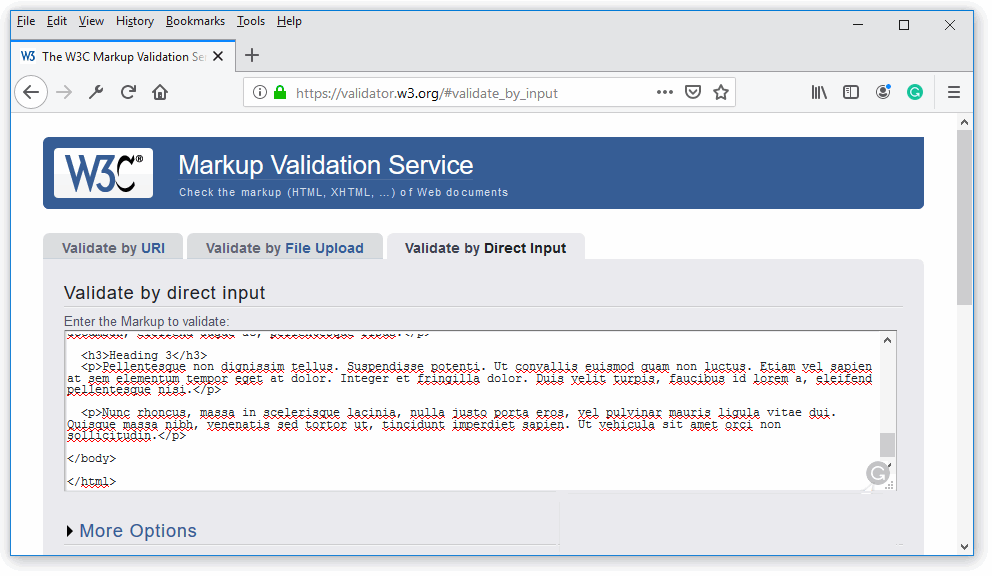
Select your entire HTML file (both <head> and <body>), and copy-and-paste it into the box named Enter the Markup to validate.
Click the Check button.
If you see any errors, return to your base-7.html file in your text editor, fix the errors, save the file, and copy-and-paste the entire file again.
In the HTML Validator, click the Back button of your web browser to again display the Validate by Direct Input tab. Click once in the tab and paste in your corrected HTML file. Your new, pasted-in file will replace the earlier version. Finally, click the Check button.
Validating your stylesheet
To check your CSS is correct, use the official W3C CSS Validation Service. Follow these steps.
Copy and paste your CSS file into the box named Enter the CSS you would like validated.
Click the Check button.
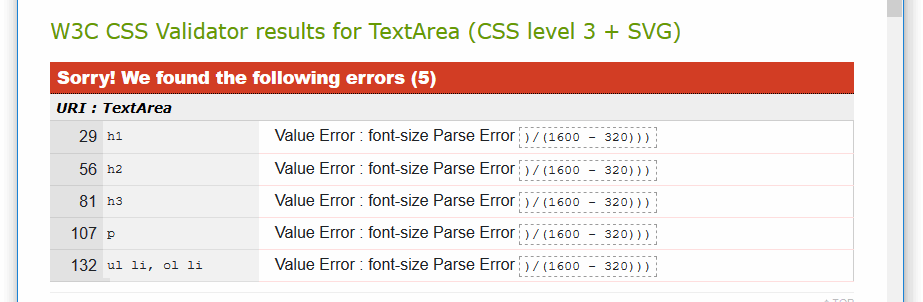
If you see any errors (other than those related to the fluid typographic equation, as shown below), return to your base-7.css file in your text editor, fix the errors, save the file, and copy the entire file again.
In the CSS Validator, click the Back button of your web browser to again display the By direct input tab. Click once in the tab and paste in your corrected CSS file. Your new, pasted-in file will replace the earlier version. Finally, click the Check button.
Uploading your two files to GitHub
After validating your web page and stylesheet, you are now ready to upload them to your account on GitHub.
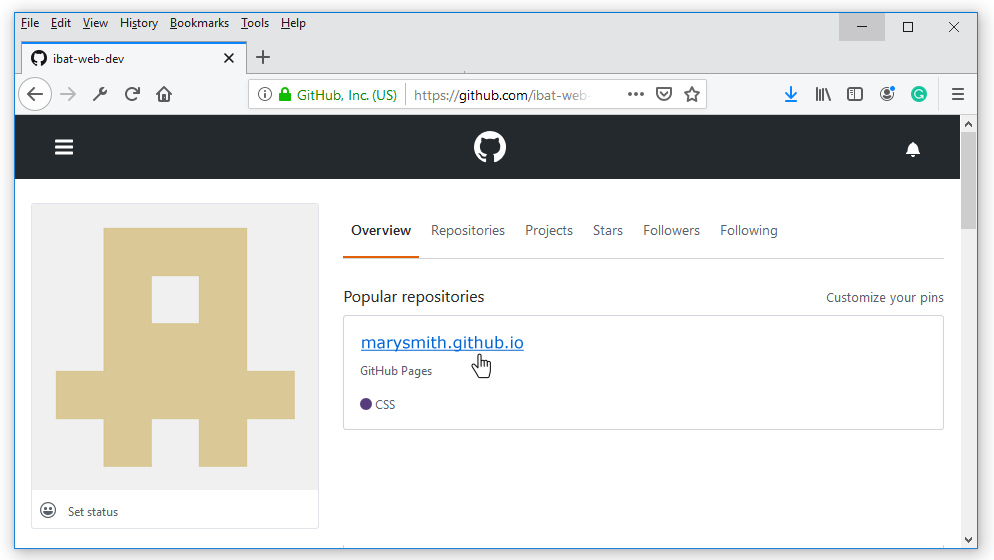
Sign in to your account at GitHub.com. At the left of the screen, you can see a list of your repositories.
On your GitHub home page, click the name of the repository that holds your web pages. Its name will look as follows, where username is your chosen username on GitHub.
username.github.io
On the next screen displayed, near the centre of the screen, click the Upload button.
Select or drag-and-drop the two files base-7.html and base-7.css to upload them to your GitHub account.
After uploading your files, scroll down to the bottom of the screen, enter a short message in the Commit changes box and click the Commit changes button.
Your web page is now published on GitHub at a web address similar to the following, where username is the username you have chosen for your GitHub account:
https://username.github.io/base-7.html
It may take a few minutes for your uploaded file to appear on GitHub.


 In the Chrome DevTools window, you can see the Elements panel at the left and the Styles sub-panel at the right.
 In the Styles sub-panel, you can see the text and background colour values of the selected web page element.
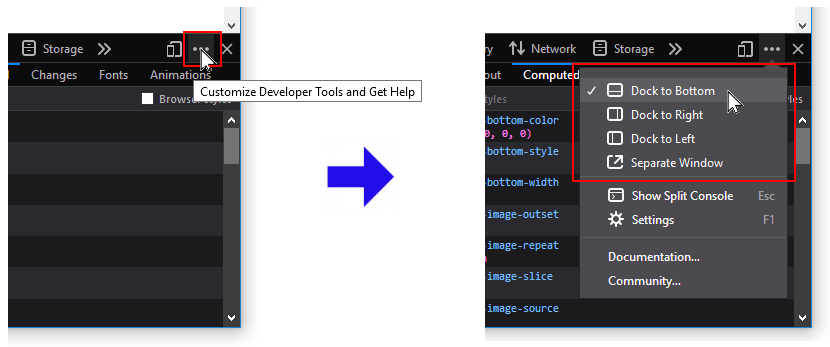
 In the centre panel of the Firefox DevTools window, you can see the text and background colour values of the selected web page element.