Learning Goals
At the end of this Tutorial, you will be able to:
- Use the React render() method to update the HTML content of a web page.
Create a new folder named react with a sub-folder named exercises.
In your new react/exercises folder, create a new sub-folder named 1.
Save the file below to this new react/exercises/1 sub-folder and unzip it.
📄 1.zip
React: Quick setup
The fastest way to get started with React is to:
- Import the React (version 18) libraries and Babel transformer from a CDN.
- View your React-powered web pages with the VSCode Live Server extension.
Your index.html from the downloaded exercises file should look as shown below.
Your local index.js file is empty. Note that the link to this file from index.html has an attribute of type="text/babel".
Exercise 1.1: Displaying a message
Follow these steps to use React to display a message in your web page.
- In VS Code, open the index.html and index.js files. Display the index.html file with Live Server in your web browser.
- In your index.html file, you can see a single div tag with an ID of root.
<div id="root"></div>
- In your index.js file, enter the following:
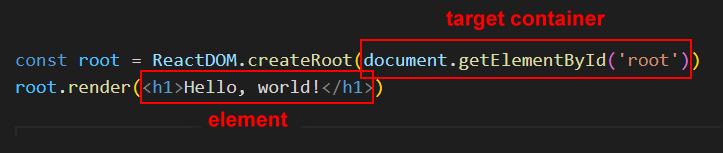
const root = ReactDOM.createRoot(document.getElementById('root')) root.render(<h1>Hello, world!</h1>) - Save both files. You should now see the message in your web browser.
The imported React library gives you access to the ReactDOM global variable. This has a method named render() that means 'display in web page'.
The two lines of code specify:
- Where: The location or 'container' where the element is to be inserted.
- What: The element to be inserted in the web page.
About DOM elements and React elements
In the web browser DOM, elements are nodes that are similar to but not fully objects.
<h1>Hello, world!</h1>
In React, however, elements are fully objects.
React will update the DOM nodes (of the web page) to match the React elements (of the React code).
Elements are the building blocks of React components.
About the root node
In the above simple example, the HTML DOM contains a single div with an ID of root that is updated by React.
<div id="root"></div>
Typically, apps built with React just have just a single root DOM node.
However, you may have as many React-controlled DOM nodes as you like.
<div id="root"></div>
<div id="something"></div>
<div id="anotherthing"></div>
Exercise 1.2: Rendering multiple elements
Let's try to use React to render two elements on our web page.
- In index.js, update the second React statement as follows:
root.render(
   <h1>Hello, world!</h1>
   <p>Hope you are well.</p>
)
This will not work! The render() method can display only one element – but this can a parent element with multiple child elements. - Rewrite your code by wrapping the two elements inside a single span tag as shown below.
root.render(
   <span>
      <h1>Hello, world!</h1>
      <p>Hope you are well.</p>
   </span>
)
Your new, updated message should now display correctly.
Exercise 1.3: Rendering elements with classes
Often the elements you will want to display with render() will contain CSS classes.
However, in JavaScript code class is a reserved keyword used for defining classes. When rendering HTML classes, React uses the term className instead. See the exercise below.
- In index.js, update the React render() statement as follows:
root.render(
   <div className="yellow-box">
      <h1>Hello, world!</h1>
      <p>Hope you are well.</p>
   </div>
)
The CSS-styled output should display correctly in your web page.
Exercise 1.4: Rendering elements and closing tags
React is a lot stricter when dealing with syntax than are web browsers when displaying HTML. See this exercise.
- In index.html, add the following new div container.
<div id="main"></div>
- In index.js, add this React statement that will create a variable named main.
const main = ReactDOM.createRoot(document.getElementById('main')) - Next, add a new render() statement with the element to be displayed on the web page.
main.render(<section className="theme-light w-800px">
   <figure><img src="https://lunevedy.netlify.app/ui/assets/img/1024x618-cafe.jpg" alt="sample image"></figure>
   <h2>Nice section heading</h2>
   <p>Leverage agile frameworks to provide a robust synopsis for high level overviews. Iterative approaches to corporate strategy foster collaborative thinking to further the overall value proposition.</p>
   <p>At the end of the day, going forward, a new paradigm that has evolved from generation X is on the runway heading towards a streamlined cloud solution.</p></section>
)
In this example, the various elements to be rendered are wrapped inside a parent <section> container. But the code does not run! - The reason is that the img tag has no closing forward slash />. Update the tag as follows.
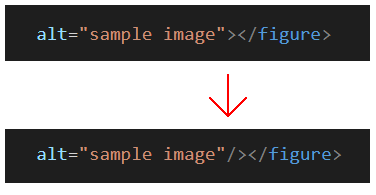 Your code will now run correctly.