Learning Goals
At the end of this Tutorial you will be able to:
- Understand the basic structure of an HTML file.
- Recognise the common elements found in the <head> section of every HTML file.
HTML files: The basic structure
The simplest possible HTML file has four main parts and looks as shown below.

Let’s review these four parts of an HTML file:
- <!DOCTYPE html>: Web browsers can display different types of files. For example, image files (such as dog.jpg or cat.png) and Adobe Acrobat files (such as letter.pdf).
The <!DOCTYPE html> on the very first line of an HTML file tells the web browser: “I am an HTML file. So please display me as a web page”.
<!DOCTYPE html>The word ‘doctype’ line can be written in upper-case or lower-case letters. Either is correct. If you visit the Microsoft and Google websites and use the View Page Source command in your web browser, you can see the first contains <!DOCTYPE html> and the second <!doctype html> - <html>…</html> This marks the beginning and the end of the HTML file. Only the DOCTYPE comes before the opening <html> tag, and nothing comes after the closing </html> tag.
Typically, the opening <html> tag also sets the language used in the text of the HTML file. For example:
<html lang="en"> - <head>…</head> This pair of opening and closing tags contains everything except the actual content of the web page. The <head>…</head> is needed for the <body>…</body> of the web page to display correctly.
- <body>…</body>: This contains the content of the web page. Everything you can see in a web browser will be inside the <body>…</body> tags of the HTML file. Typically, this includes text and images, wrapped in HTML markup tags such <h1>, <h2>, <p>, <img> and so on. Any JavaScript code in an HTML file is typically placed near the end, just before the closing </body> tag.
A typical <head> of an HTML file
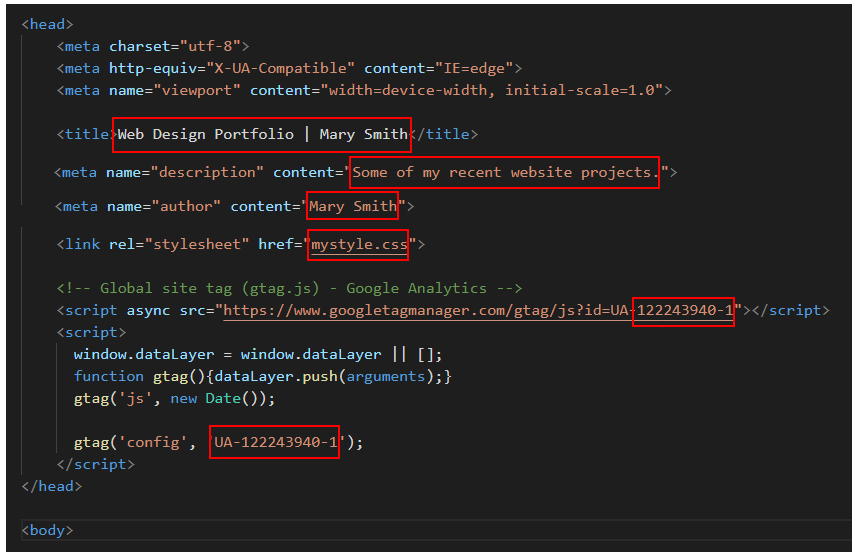
You will find the same elements inside <head>…</head> of every HTML file. A typical example is shown below. The values that will be different on different web pages and websites are highlighted in red.

Let’s review the various parts of a typical <head>…</head> in an HTML file.
- Character encoding: The first line within the <head> controls the display of characters (letters, numbers and symbols) on your web page. This includes special symbols such as ® and €, and non-English characters such as ä and Ó. Note that this is a self-closing tag.
<meta charset="utf-8"> - Microsoft web browsers: This line applies only to how your web page is displayed on web browsers made by Microsoft.
<meta http-equiv="X-UA-Compatible" content="IE=edge">In summary, this forces the web page to use Microsoft Edge, if available. If that is not installed on the user’s computer, it forces the web page to use the most recent version (2016) of Internet Explorer. This is also a self-closing tag. - Responsive display: Users view web pages on a range of devices, such as mobile phones, tablets, laptops and desktops.
By including this line in the <head> of your HTML file, and using media queries in your CSS file(s), you can ensure your web page will be able to shrink or expand according to the width and height of the user’s screen. This is another self-closing tag.
You will learn more about responsive web design (RWD) in these two Tutorials: Responsive Web Design and Media Queries and Responsive Web Design and Fluid Typography.
<meta name="viewport" content="width=device-width, initial-scale=1.0"> - <title>…</title>: This pair of tags contains the title you want to give to your web page. It is displayed at the top of the web browser window; when the web page is added to a user’s list of bookmarks/favourites; and as clickable text in search engine results.

- <meta name="description">: This tag is where you write a brief description of your web page. It is typically up to 160 characters in length and is a self-closing tag. Here is an example:
<meta name="description" content="How to set up a domain name and website in four easy-to-follow, quick and affordable steps.">This description is typically displayed on the search engine results page (SERP) of Google and other search engines, underneath the clickable page title.
- <meta name="author">: Another self-closing tag. This is where you identify yourself as the author/creator of the web page. For example:
<meta name="author" content="Mary Smith"> - Stylesheet link: A web page (HTML file) typically includes a link to at least one stylesheet (CSS file). Here is an example of this self-closing tag:
<link rel="stylesheet" content="mystyle.css">Linking a web page to a stylesheet is covered in this Tutorial: Styling HTML with CSS. - Google Analytics snippet: This ‘snippet’ (a few lines of code) is usually placed as the last item just before the closing </head> tag. Note that the code is preceded by a comment, and contains two pairs of opening <script> and closing </script> tags. Working with Google Analytics and generating the unique tracking code for your website is covered in this Tutorial: Setting Up Google Analytics.

